
If your motorcycle is not running as smoothly as it used to, clogged fuel injectors might be the reason. Cleaning your motorcycle’s fuel injectors can boost performance, improve fuel efficiency, and save you money on repairs.
But how do you do it right without causing damage? In this guide,, we will explore how to clean motorcycle fuel injectors and discover simple, effective steps to clean your fuel injectors and keep your bike running like new. Keep reading—you’ll learn easy tips that anyone can follow to get the best results.

Signs Of Dirty Fuel Injectors
Dirty fuel injectors can cause several problems for your motorcycle. Knowing the signs helps you spot issues early. This keeps your bike running smooth and saves repair costs.
Engine Misfires And Rough Idle
Dirty injectors block fuel flow. This causes engine misfires or rough idling. Your bike may shake or hesitate during rides.
Poor Fuel Economy
Clogged injectors waste fuel. You will notice more trips to the gas station. Fuel economy drops noticeably over time.
Loss Of Power And Acceleration
Fuel delivery slows down with dirty injectors. The engine feels weak and slow. Acceleration becomes sluggish, affecting ride quality.
Hard Starting
A bike with dirty injectors may struggle to start. It takes longer to fire up. Sometimes, it won’t start at all.
Increased Emissions
Blocked injectors cause incomplete fuel burning. This raises harmful emissions. Your bike may fail emission tests or produce more smoke.

Tools And Materials Needed
Cleaning motorcycle fuel injectors requires specific tools and materials. Having the right items makes the job easier and safer. It also helps protect the injector from damage. Below is a list of what you need to prepare before starting.
Safety Gear
Wear gloves to protect your hands from fuel and chemicals. Safety glasses shield your eyes from splashes. Work in a well-ventilated area to avoid inhaling fumes.
Basic Hand Tools
You need screwdrivers, pliers, and wrenches to remove the fuel injectors. A socket set helps with tight bolts. Keep a clean cloth nearby to wipe dirt and spills.
Fuel Injector Cleaner Kit
Use a fuel injector cleaning kit designed for motorcycles. It usually includes a cleaning solution and adapter hoses. The kit helps remove dirt and buildup inside the injector.
Cleaning Solution
Choose a high-quality fuel injector cleaner. It dissolves deposits that block fuel flow. Avoid harsh chemicals that can damage injector parts.
Compressed Air
Compressed air helps dry the injectors after cleaning. It removes leftover liquid and debris. Use a low-pressure setting to avoid damaging parts.
Replacement Seals And O-rings
Old seals can leak fuel after cleaning. Have new seals and O-rings ready for installation. This ensures a tight, leak-free fit.
Safety Precautions Before Starting
Cleaning motorcycle fuel injectors can improve engine performance and fuel efficiency. Safety must come first before starting any work on your bike. Taking the right precautions protects you and your motorcycle from damage and accidents.
Fuel injectors work with gasoline, which is highly flammable. Careless handling can cause fires or injuries. Also, some cleaning chemicals can be harmful if not handled properly. Knowing the safety steps is essential for a smooth and safe process.
Wear Protective Gear
Always wear gloves to protect your hands from fuel and chemicals. Use safety glasses to shield your eyes from splashes. Wear long sleeves and pants to avoid skin contact. Good ventilation is important to avoid inhaling fumes.
Work In A Well-ventilated Area
Choose an open space or a garage with good airflow. Gasoline fumes can build up quickly and cause health issues. Proper ventilation reduces the risk of breathing harmful vapors. Keep a fan nearby if possible to improve air circulation.
Disconnect The Battery
Remove the motorcycle battery before starting. This prevents accidental sparks or electrical shocks. Disconnecting the battery reduces the risk of fire during cleaning. Make sure to follow your motorcycle manual for the correct procedure.
Keep Fire Extinguisher Nearby
Always have a fire extinguisher ready before working with fuel. Choose one rated for gasoline fires. Knowing how to use it can save your bike and yourself. Keep it within easy reach at all times.
Avoid Open Flames And Sparks
Do not smoke or use any open flames near the work area. Avoid using power tools that may create sparks. Gasoline vapors are highly flammable and can ignite easily. Make sure all ignition sources are eliminated before starting.
Removing The Fuel Injectors
Removing the fuel injectors is an important step in cleaning them. Proper removal helps avoid damage to the injectors and the motorcycle. Take your time and follow these simple steps for a safe process.
Gather Necessary Tools
Prepare tools like screwdrivers, pliers, and a wrench set. Keep a clean cloth handy to wipe any spills. Having the right tools makes removal easier and safer.
Disconnect The Battery
Always disconnect the battery before starting. This prevents accidental sparks and electrical issues. Safety first to protect yourself and the motorcycle.
Locate The Fuel Injectors
Find the fuel injectors by checking near the engine intake. They are usually connected to the fuel rail. Knowing their position helps avoid unnecessary parts removal.
Relieve Fuel Pressure
Release the fuel pressure to prevent fuel spray. Use the valve on the fuel rail or loosen the fuel pump fuse. Take care to avoid fuel contact with skin or eyes.
Remove Electrical Connectors
Gently disconnect the wiring harness from each injector. Press the clip and pull without forcing. Damaging connectors can cause injector problems later.
Detach Fuel Injectors
Loosen the fuel rail mounting bolts carefully. Lift the fuel rail slightly to free the injectors. Pull the injectors out straight to avoid damage.
Inspecting The Injectors For Damage
Inspecting the injectors for damage is a key step before cleaning motorcycle fuel injectors. It helps spot problems that can affect engine performance. Careful inspection ensures the injectors work well and last longer.
Damaged injectors can cause poor fuel flow and engine misfires. Catching damage early can save time and repair costs.
Visual Inspection For Cracks And Leaks
Start by looking closely at each injector. Check the body for cracks or breaks. Look for fuel leaks around the seals or nozzles. Any visible damage means the injector needs repair or replacement.
Checking The Electrical Connector
Inspect the electrical connector on each injector. Look for bent pins or corrosion. A damaged connector can cause poor signal and injector failure. Clean or replace connectors as needed.
Testing Injector Spray Pattern
Use a spray tester to check the fuel spray pattern. The spray should be even and fine. A weak or uneven spray shows injector problems. Faulty injectors need cleaning or replacement.
Feeling For Clogs Or Blockages
Gently tap the injector tip to detect clogs. Blockages reduce fuel flow and cause rough running. Cleaning helps but severe clogs may require injector replacement.
Choosing The Right Cleaning Solution
Choosing the right cleaning solution is key for effective motorcycle fuel injector care. The solution must remove dirt and deposits without harming parts. Using the wrong cleaner can cause damage or poor engine performance.
Focus on solutions made for fuel injectors. These cleaners dissolve varnish and carbon buildup safely. Avoid harsh chemicals that can erode seals or metal parts.
Types Of Fuel Injector Cleaners
There are several types of cleaners. Some are liquid additives added to the fuel tank. Others are spray cleaners used during injector removal. Each type serves a different cleaning need.
Key Ingredients To Look For
Good cleaners contain polyether amines or similar detergents. These break down tough carbon deposits. Avoid cleaners with strong acids or solvents that harm engine parts.
Compatibility With Your Motorcycle
Check the cleaner’s label for compatibility. Some formulas suit only specific engine types. Use a cleaner that fits your motorcycle’s fuel system and engine model.
Environmental And Safety Considerations
Choose non-toxic, biodegradable cleaners when possible. They protect the environment and are safer to handle. Always follow safety instructions on the product label.
Cleaning Injectors With Ultrasonic Cleaner
Cleaning motorcycle fuel injectors with an ultrasonic cleaner is a precise and effective method. This tool uses sound waves to remove dirt and deposits. It reaches tiny parts that are hard to clean by hand.
The ultrasonic cleaner breaks down grime without damaging the injector. This helps the injector work better and last longer. It also improves fuel efficiency and engine performance.
Preparing The Injectors For Ultrasonic Cleaning
Remove the injectors carefully from the motorcycle. Check for any visible damage or cracks. Place the injectors in the ultrasonic cleaner basket. Avoid stacking them to allow full cleaning action.
Use a cleaning solution made for fuel injectors. Avoid harsh chemicals that can harm the injector parts. Fill the ultrasonic cleaner with this solution. The liquid helps loosen deposits during cleaning.
Running The Ultrasonic Cleaner
Set the cleaner to the recommended time, usually 10 to 15 minutes. The ultrasonic waves create tiny bubbles in the liquid. These bubbles burst and remove dirt from injectors. After the cycle, remove the injectors and rinse with clean water.
Drying And Reinstalling The Injectors
Dry the injectors fully using compressed air or a clean cloth. Ensure no water remains inside. Reinstall the injectors carefully back into the motorcycle. Test the engine to confirm improved fuel spray and performance.
Manual Cleaning Techniques
Manual cleaning techniques help keep motorcycle fuel injectors working well. These methods remove dirt and grime without special machines. Cleaning injectors by hand saves money and extends their life.
Manual cleaning takes patience and care. Follow the steps carefully to avoid damage. Use the right tools and cleaning solutions for best results.
Remove The Fuel Injectors Safely
Start by turning off the motorcycle engine. Disconnect the battery to avoid sparks. Locate the fuel injectors on the engine. Use a wrench to loosen the injector bolts. Carefully pull the injectors out. Keep small parts safe for reassembly.
Soak Injectors In Cleaning Solution
Use a fuel injector cleaner made for motorcycles. Place injectors in a small container. Pour enough cleaner to cover them. Let injectors soak for 30 to 60 minutes. This loosens dirt and deposits inside. Avoid harsh chemicals that can damage parts.
Use A Soft Brush For Cleaning
After soaking, gently scrub injectors with a soft brush. Focus on the injector tips and holes. Do not use hard brushes or metal tools. Rinse injectors with clean water or cleaner. Shake off excess liquid before drying.
Dry And Inspect The Injectors
Use a clean cloth to dry injectors carefully. Check for cracks, rust, or damage. Inspect the O-rings and seals closely. Replace any worn or broken parts before reinstalling. Dry injectors fully to prevent engine problems.
Reinstall The Fuel Injectors
Put injectors back into their original places. Tighten bolts securely but do not over-tighten. Reconnect the battery and fuel lines. Start the motorcycle and check for leaks. Test ride to ensure smooth engine performance.
Drying And Reassembling Injectors
Drying and reassembling motorcycle fuel injectors is a key step in injector maintenance. Proper drying prevents damage and ensures smooth engine performance. Careful reassembly restores the injector to its working condition.
After cleaning, injectors must be completely dry before reinstallation. Moisture inside can cause engine problems. Use a clean, lint-free cloth to wipe the exterior gently. Let the injectors air dry in a dust-free area for at least 30 minutes.
Never use compressed air directly on delicate parts. It can damage the injector tips or seals. Avoid heat sources like hair dryers that may warp plastic components. Patience in drying pays off with better engine response.
Inspect Injector Seals And O-rings
Check all seals and O-rings for cracks or wear. Replace any damaged parts with new ones. Proper sealing prevents fuel leaks and maintains pressure. Use a small amount of clean engine oil to lubricate the O-rings before installation. This helps them seat smoothly and reduces friction.
Align Injector Components Carefully
Match each injector part to its correct position. Misalignment can cause poor spray patterns and engine misfires. Fit the injector nozzle, body, and electrical connector gently but firmly. Avoid forcing parts together to prevent breakage.
Tighten Fasteners To Manufacturer Specs
Use a torque wrench to tighten screws or bolts. Follow the motorcycle manual for exact torque values. Over-tightening can crack injector housing. Loose fasteners may cause vibrations and fuel leaks.
Reinstalling Fuel Injectors
Reinstalling fuel injectors is a key step after cleaning. It ensures your motorcycle runs smoothly and efficiently. Proper installation helps avoid leaks and engine problems. Take your time and follow each step carefully.
Prepare The Fuel Injector Area
Clean the injector port gently with a cloth. Remove any dirt or debris from the area. Check for damage or wear in the injector seat. A clean area helps the injector fit tightly.
Apply Lubricant To Seals
Use a small amount of engine oil on injector seals. This helps the seals slide into place easily. Avoid using too much oil to prevent dirt buildup. Proper lubrication protects seals from damage.
Align And Insert The Fuel Injectors
Hold the fuel injector carefully. Align it with the injector port on the engine. Press the injector straight into the port. Avoid twisting or forcing it in. The injector should fit snugly without gaps.
Secure The Fuel Injectors
Attach the clips or bolts that hold the injectors. Tighten them to the correct torque specification. Loose injectors can cause fuel leaks or poor engine performance. Check that each injector is firmly in place.
Reconnect Fuel Lines And Electrical Connectors
Reconnect the fuel lines to the injectors. Make sure the connections are tight to prevent leaks. Plug in the electrical connectors securely. These connections control the injector’s fuel spray.
Test The Installation
Turn on the motorcycle ignition without starting the engine. Listen for unusual sounds or fuel leaks. Start the engine and watch for smooth running. Any issues mean you should recheck the installation.
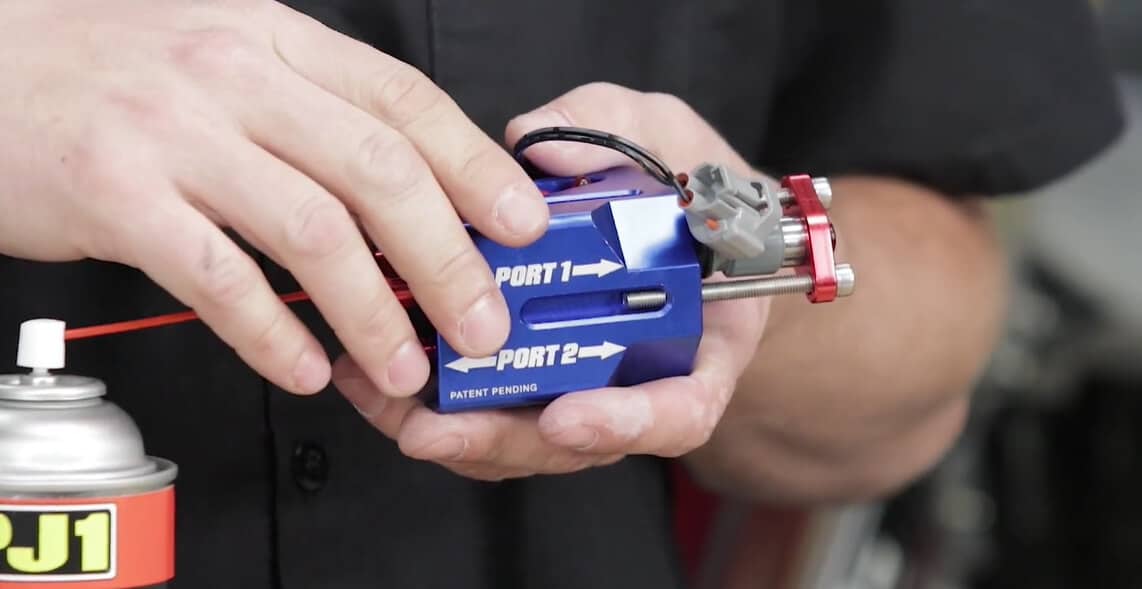

Testing Injector Performance
Testing injector performance shows if fuel sprays evenly and clearly. Cleaning motorcycle fuel injectors removes dirt, helping the engine run smoothly. Regular checks keep your bike’s power steady and fuel use low.
Understanding Injector Performance
Testing injector performance helps keep your motorcycle running smooth. Fuel injectors spray fuel into the engine. If they don’t work well, the engine may run rough or lose power.
Regular testing finds problems early. It saves money and avoids big repairs later. Testing shows how well the injectors spray fuel and if they deliver the right amount.
Tools Needed For Testing
Use a multimeter to check injector resistance. A fuel pressure gauge measures fuel flow. A scan tool reads injector pulse and engine data. These tools make testing easy and accurate.
Steps To Test Injector Resistance
First, disconnect the injector’s electrical connector. Set the multimeter to ohms. Place the probes on injector terminals. Read the resistance value. Compare it with the manufacturer’s specs. A wrong value means injector may be faulty.
Checking Injector Spray Pattern
Remove the injector and connect it to a fuel source. Activate the injector briefly. Watch the spray pattern carefully. It should be even and fine. Drips or uneven spray means cleaning or replacement is needed.
Using A Scan Tool For Injector Pulse
Connect the scan tool to the bike’s diagnostic port. Start the engine and monitor injector pulse width. This shows how long the injector stays open. Abnormal pulse times affect fuel delivery and engine performance.
Preventive Tips For Injector Maintenance
Keeping motorcycle fuel injectors clean helps the engine run smoothly. Dirty injectors cause poor fuel flow and reduce performance. Regular care prevents damage and costly repairs. Follow these simple tips to keep injectors in top shape.
Use High-quality Fuel
Good fuel contains fewer impurities. It reduces the chance of injector clogging. Avoid cheap or old fuel. Always buy from trusted stations.
Regularly Add Fuel Injector Cleaner
Add cleaner to your fuel tank every few thousand miles. This helps remove buildup inside injectors. Choose a cleaner made for motorcycles. It keeps injectors flowing freely.
Change Fuel Filters Often
Fuel filters catch dirt before it reaches injectors. Replace filters as recommended by the motorcycle manual. Clean filters protect the injectors from debris.
Inspect And Clean Air Filters
Dirty air filters affect engine performance. Clean or replace air filters regularly. This keeps air flow balanced and reduces injector strain.
Keep The Fuel System Dry
Water in the fuel system causes corrosion and blockages. Avoid storing your motorcycle in damp places. Use a fuel stabilizer if storing for a long time.
FAQs about How to Clean Motorcycle Fuel Injectors
How Often Should I Clean Motorcycle Fuel Injectors?
Fuel injectors should be cleaned every 15,000 to 30,000 miles. This keeps the engine running smoothly and saves fuel. Regular cleaning prevents clogging and poor performance.
What Tools Do I Need To Clean Fuel Injectors?
You need a fuel injector cleaner kit, a screwdriver, and safety gloves. The cleaner kit helps remove dirt inside the injectors. Gloves protect your hands from chemicals and fuel.
Can I Clean Fuel Injectors Without Removing Them?
Yes, some cleaners allow cleaning without removal. You add the cleaner directly to the fuel tank or use a cleaning device. This method is easier but less thorough than removal cleaning.
Conclusion
Cleaning motorcycle fuel injectors keeps your engine running smooth. It helps save fuel and reduces pollution. Regular cleaning prevents costly repairs later on. Use the right tools and follow safety steps. A clean injector means better power and less trouble.
Take time to maintain your bike well. Small efforts bring big results. Keep your ride healthy and enjoy every journey.