
Credit: www.partzilla.com
What is a Stator?
The stator is a set of wire coils inside the motorcycle engine. It makes electricity when the engine runs. This electricity charges the battery and powers the bike’s electrical parts. The stator works with the rotor, which spins around it. Together, they create electric current.
Why Test the Stator?
- Battery not charging – The battery may lose power quickly.
- Engine running badly – The engine can miss or stall.
- Burnt smell – You may smell burnt wires near the stator cover.
- Lights dim or flicker – Electrical parts may not work well.
If you see these signs, testing the stator is a good idea.
Tools You Will Need
- Digital multimeter (to measure voltage and resistance)
- Basic hand tools (to remove covers and connectors)
- Service manual for your motorcycle (for exact numbers)
Using a multimeter is the best way to test the stator. It shows if the wires are good or broken and if electricity is made properly.
Credit: roadstercycle.com
Safety Disclaimer
Always turn off your motorcycle and let the engine cool down before testing the stator. Use caution when working around electrical components and moving engine parts. Wear safety gloves and eye protection whenever possible. If you are unsure about any step or do not feel comfortable performing electrical tests, consult a qualified motorcycle mechanic for help.
Step-by-Step Guide to Test a Motorcycle Stator
1. Prepare Your Motorcycle
Make sure the motorcycle is off and cooled down. Put it on a stand or stable surface. Remove the seat or side covers if needed to access the stator and its wires.
2. Locate The Stator Connector
The stator wires connect to the regulator or rectifier. This is usually a small plug with three yellow wires. Find this connector and unplug it carefully.
3. Perform A Ground (continuity) Test
This test checks if any stator wire touches the metal engine parts. If yes, the stator is shorted and bad.
- Set the multimeter to the continuity or ohms setting.
- Touch one probe to each yellow wire.
- Touch the other probe to the engine frame or metal case.
- You should see no connection (no beep or infinite resistance).
If the meter shows a beep or low resistance, the stator coil is grounded. This means it is damaged and needs fixing.
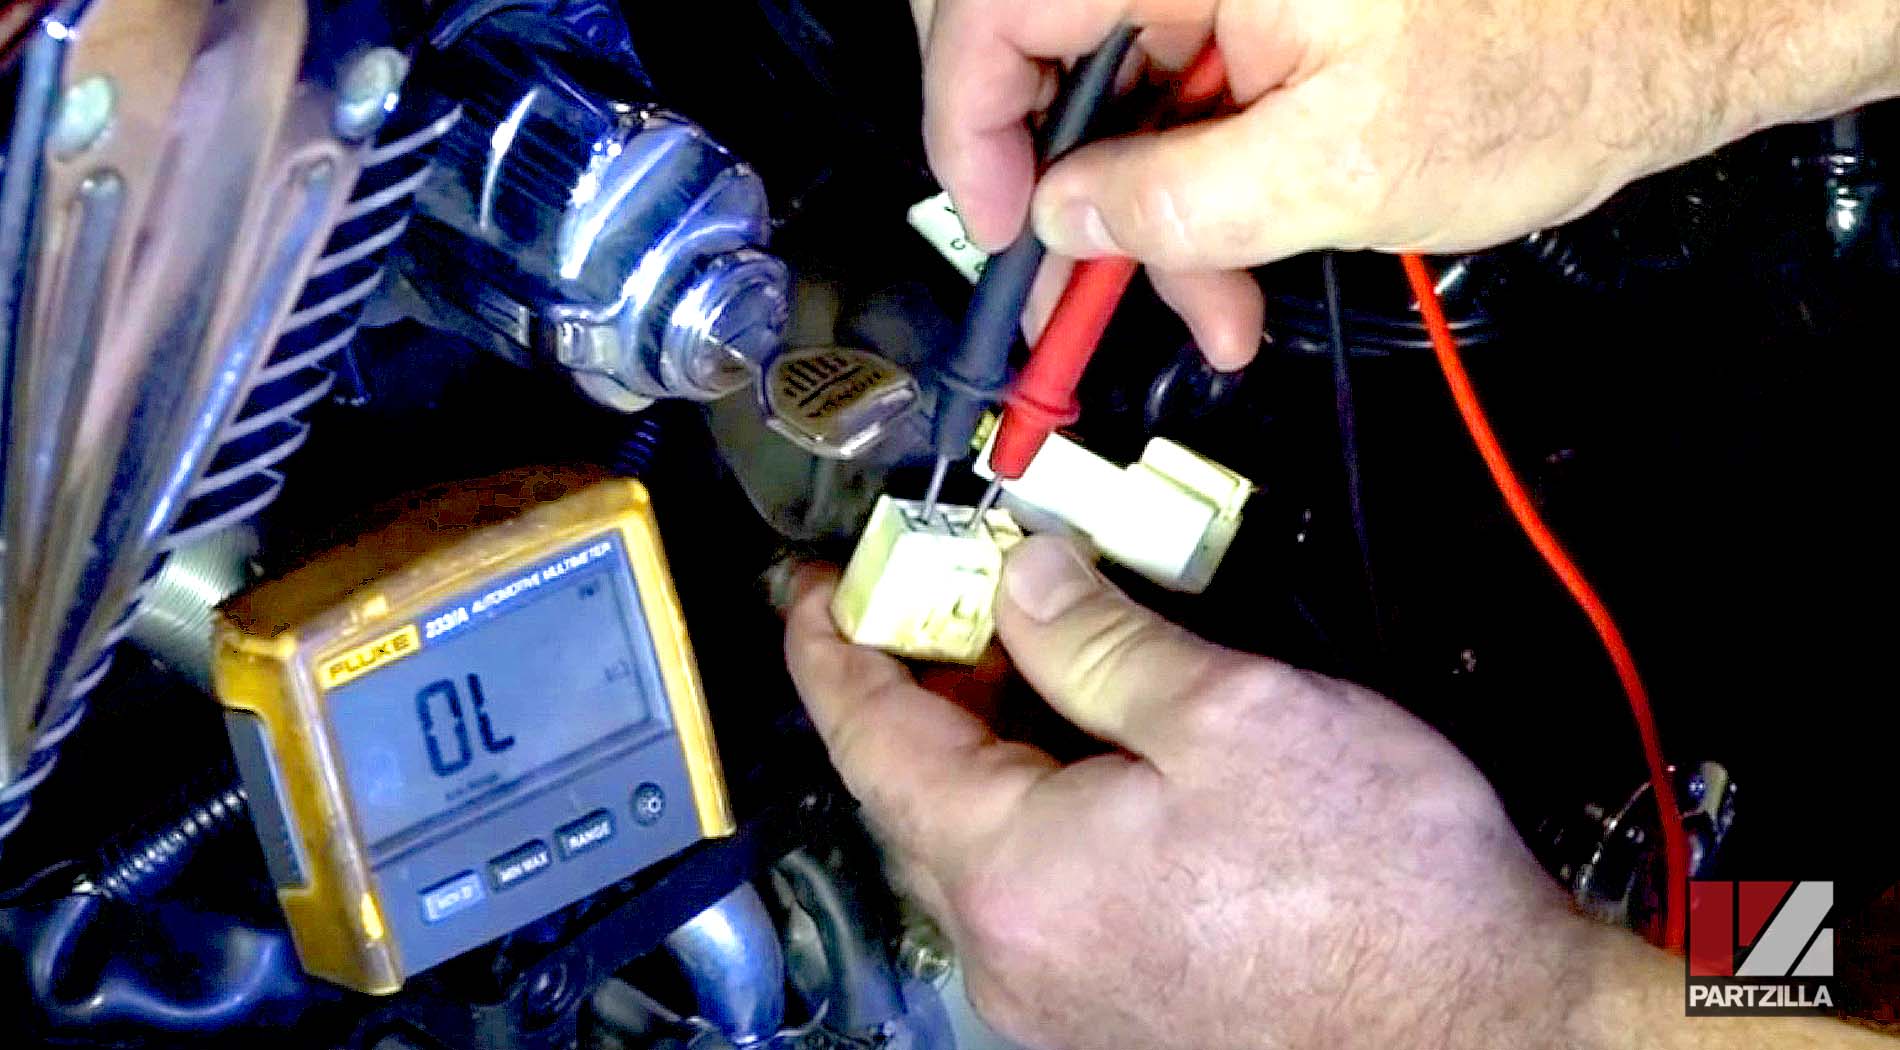
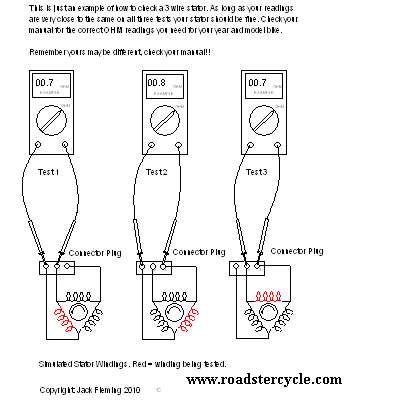
4. Test The Resistance Between Stator Wires
Now check the resistance between the stator wires themselves. This shows if the wires inside the stator are broken or burnt.
- Keep the multimeter on the resistance (ohms) setting.
- Measure resistance between all pairs of yellow wires.
- For example, wire 1 to wire 2, wire 2 to wire 3, and wire 1 to wire 3.
You should get similar resistance values for all pairs. Check your motorcycle’s manual for exact numbers. Usually, the resistance is low but not zero.
If one pair shows very high or infinite resistance, the stator coil is broken.
5. Test The Ac Voltage Output
This test checks if the stator produces electricity when the engine runs.
- Reconnect the stator wires to the regulator.
- Set the multimeter to AC voltage.
- Start the motorcycle engine and let it idle.
- Measure the AC voltage between each pair of yellow wires.
- You should see around 20 to 50 volts AC at low engine speed.
Voltage will increase when you rev the engine higher. If the voltage is very low or zero, the stator is not working well.
Summary Table of Tests
| Test Type | What to Check | Good Result | Bad Result |
|---|---|---|---|
| Ground Test | Check if wires touch engine ground | No beep or infinite resistance | Beep or low resistance (coil grounded) |
| Resistance Test | Resistance between yellow wires | Similar, low resistance (check manual) | High or infinite resistance (coil broken) |
| AC Voltage Test | Voltage output with engine running | 20-50 volts AC or more (varies by bike) | Very low or zero voltage output |
Tips for Testing Your Motorcycle Stator
- Always use a good multimeter for accurate tests.
- Follow your motorcycle service manual for numbers.
- Check connectors and wires for damage before testing.
- Test the battery and regulator too, if stator seems fine.
- Wear gloves and safety glasses when working on the bike.
Common Signs of a Bad Stator
Knowing these signs can help you decide to test the stator:
- Battery drains fast or does not charge.
- Headlights or dashboard lights flicker or dim.
- Engine runs rough or stalls after starting.
- Burnt smell or burnt wires near the stator cover.
- Multimeter tests show bad readings as explained.
What to Do If Your Stator Is Bad
If tests show the stator is bad, you have options:
- Replace the stator with a new one.
- Have the stator rewound by a professional.
- Check related parts like the regulator and battery.
Do not ignore a bad stator. It can cause your bike to stop working.
FAQs About Test a Stator on a Motorcycle
How Do You Test A Stator With A Multimeter?
Set your multimeter to ohms. Test resistance between stator wires; values must match your manual. Check for no continuity between wires and ground. Run the engine and measure AC voltage output on each phase. Proper readings confirm a good stator.
What Are Three Basic Checks That Can Be Performed On A Stator?
Three basic checks on a stator include continuity test, resistance test, and output voltage test using a multimeter.
Will A Bad Stator Still Spark?
A bad stator may still produce a weak or inconsistent spark. This causes engine misfires or poor running. Test with a multimeter to confirm.
How Many Ohms Should A Motorcycle Stator Have?
A motorcycle stator typically has a resistance between 0. 1 and 1. 0 ohms per phase. Check your service manual for exact specs. Ensure no continuity to ground, indicating no shorts. Use a multimeter to test resistance between stator wires for accurate diagnosis.