
Have you ever looked at your motorcycle helmet and wished it reflected your own style instead of looking like everyone else’s? Learning how to paint a motorcycle helmet is a great way to give your riding gear a fresh, custom look without buying a brand-new helmet. However, painting a helmet isn’t just about choosing the right colors—it also requires the right materials, proper preparation, and safe painting techniques to avoid damaging the helmet. In this step-by-step guide, you’ll learn how to paint a motorcycle helmet safely, choose the best paint, create a professional-looking finish, and protect your design so it lasts for years.
Quick Answer
Yes, you can paint a motorcycle helmet, but you must use the right materials and follow safe painting techniques. Start by cleaning and sanding the helmet, apply a compatible primer, paint in thin, even coats, and finish with a helmet-safe clear coat. Using the correct products helps create a durable finish while reducing the risk of damaging the helmet.

Can You Paint a Motorcycle Helmet Safely?
Yes, you can paint a motorcycle helmet safely, but only if you use paints and clear coats that are compatible with the helmet’s shell material. Some solvent-based products can weaken certain helmet shells, which may affect their ability to protect you in a crash. Before you begin, check the manufacturer’s recommendations and choose water-based acrylic or helmet-safe paints whenever possible. Taking the time to prepare the surface properly and using compatible materials will help you achieve a great-looking finish without compromising safety.
Understanding the Risks of Painting a Helmet
Before diving into the painting process, it’s critical to understand the potential risks involved. Painting a helmet can compromise its safety standards if not done correctly.
The choice of paint is especially vital, as certain paints may weaken the helmet’s structural integrity, which is essential for protection during a crash.
Safety Standards and Certifications
Motorcycle helmets must meet safety standards like DOT, ECE, and SNELL. These certifications ensure that a helmet can withstand impacts and protect the wearer effectively.
Altering your helmet with incompatible materials could void these safety certifications, making it potentially unsafe in the event of an accident. Always check the manufacturer’s guidelines before proceeding with any modifications.
Risks of Using Incompatible Paints
Certain paints can eat through the helmet’s materials, leading to serious safety issues. For instance, solvent-based paints may damage the helmet shell, particularly those made from plastic.
It is advisable to use water-based acrylic paints, which have been shown to be safer. Additionally, using a clear coat designed specifically for helmets can protect the paint without compromising safety.

Essential Supplies for Painting Your Helmet
To paint your motorcycle helmet successfully, you’ll need a variety of supplies. Using high-quality materials will ensure a better final result and prolong the life of your paint job.
Types of Paint: Spray vs. Brush
Spray paint is often the preferred method for painting helmets due to its ability to provide a smooth, even finish. Brush painting can offer more control for detailed designs but may not yield the same level of smoothness.
When selecting paint, look for options specifically formulated for helmets or plastics to prevent damage.
| Type of Paint | Advantages | Disadvantages |
|---|---|---|
| Spray Paint | Even coverage, quick application | Less control over design detail |
| Brush Paint | More control, ideal for detailed work | Can leave brush marks, requires more effort |
The table illustrates the key differences between spray paint and brush paint. Spray paint is favored for its ease of use and even application, making it ideal for large areas.
On the other hand, brush paint allows for finer detail work, which is beneficial for intricate designs. However, the potential for uneven application with brush paint may necessitate additional coats or touch-ups.
Ultimately, the choice depends on the desired outcome and personal comfort with each method.
Tools You Will Need
In addition to paint, you’ll need several tools to complete the job effectively. These include:
- Sandpaper (200, 400 grit)
- Masking tape
- Clear coat
- Primer
- Paintbrushes (if using brush paint)
- Protective gloves and a mask
- Old newspapers or drop cloths to protect your workspace
Preparing Your Helmet for Painting
Preparation is crucial for a successful paint job. Taking the time to clean and prepare your helmet enhances paint adhesion and helps achieve a professional finish.
Cleaning Techniques
Start by thoroughly cleaning the helmet. Use an all-purpose cleaner or a specialized degreaser to remove any grease, dirt, or residue.
It’s essential to wear gloves during this process to avoid leaving fingerprints. Once cleaned, dry the helmet with a lint-free cloth to ensure no dust or dirt remains.
Sanding Process
Sanding is a vital step in preparing your helmet. Use 200-grit sandpaper to scuff the surface, which helps the paint adhere better.
Follow up with 400-grit sandpaper for a smoother finish. Be cautious not to sand too aggressively, as this can damage the helmet material.
Ensure that the entire surface is uniformly dull before moving on to painting.
| Sanding Grit | Purpose |
|---|---|
| 200 Grit | Initial scuffing for paint adhesion |
| 400 Grit | Smoothing the surface for a better finish |
The sanding grit table emphasizes the importance of using the correct sandpaper for each stage of preparation. The 200-grit sandpaper is effective for removing the glossy surface, allowing the new paint to adhere better.
The follow-up with 400-grit ensures that the surface is smooth enough for a professional appearance. Proper sanding not only enhances adhesion but also significantly impacts the final look of the paint job.
Choosing Your Design and Color Scheme
Selecting a design and color scheme is the most creative part of helmet painting. This process allows you to express your personality and style.
Design Inspiration Sources
Many sources can inspire your helmet design. Consider looking at:
- Custom helmet designs from other riders
- Artistic styles such as graffiti or abstract
- Nature or vehicle themes
- Online design platforms for digital mock-ups
Color Theory Basics
Understanding color theory can help you create a visually appealing design. Complementary colors can make your helmet stand out while analogous colors often create a harmonious look.
Consider how colors reflect your personality and the message you want to convey through your design.
| Color Scheme | Description | Effect |
|---|---|---|
| Complementary | Colors opposite each other on the color wheel | Creates contrast and vibrancy |
| Analogous | Colors next to each other on the color wheel | Creates harmony and unity |
The color scheme table outlines two effective approaches for designing your helmet. Complementary colors can create a striking visual impact that captures attention, making your helmet stand out.
In contrast, analogous colors provide a cohesive and aesthetically pleasing appearance. Choosing the right scheme depends on your intended message and personal style, allowing for a unique representation of individuality.
Painting Methods: Step-by-Step Guide
Once you’ve prepared your helmet and chosen a design, it’s time to start painting. There are several methods you can use, each with its advantages.
Spray Painting Techniques
Spray painting is widely favored due to its ease of use and ability to provide an even coat. Begin by holding the spray can about 6-10 inches away from the helmet surface.
Apply several light coats, allowing each to dry before adding the next. This method helps prevent drips and ensures a smooth finish.
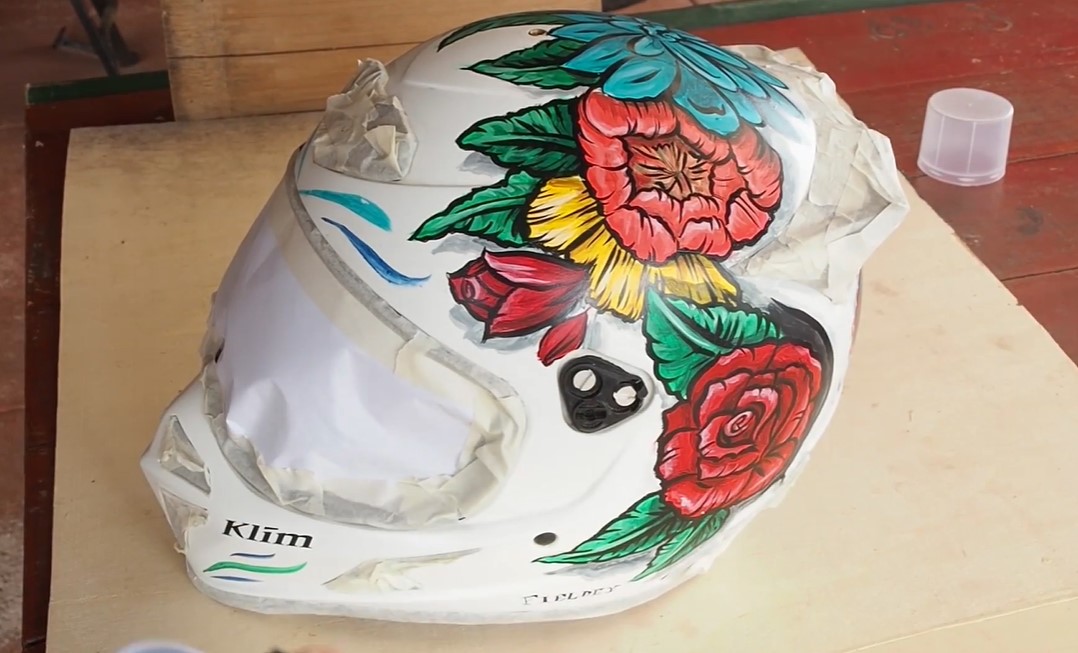
Hand Painting Techniques
If you prefer to use brushes, consider using paint markers for finer details. Start with a base coat applied with a brush, then use markers for intricate designs.
This technique allows for more creative expression but requires steady hands and patience.
| Technique | Advantages | Disadvantages |
|---|---|---|
| Spray Painting | Quick, even application | Less control for detailed work |
| Hand Painting | Great for details, personal touch | Time-consuming, requires skill |
This table compares spray painting and hand painting techniques. Spray painting offers speed and efficiency, making it suitable for larger areas.
However, hand painting allows for meticulous detail and personal touch, ideal for intricate designs. The choice between these methods depends on the desired complexity of the design and the painter’s skill level, influencing the overall outcome of the project.
Common Mistakes When Painting a Motorcycle Helmet
Painting a motorcycle helmet is easier when you avoid a few common mistakes. Keep these tips in mind for the best results:
- Using paint that isn’t compatible with the helmet material.
- Skipping the cleaning and sanding process before painting.
- Applying thick coats instead of several light, even coats.
- Forgetting to use a primer for better paint adhesion.
- Not allowing enough drying time between coats.
- Applying the clear coat too soon.
- Painting in a dusty or poorly ventilated area.
- Reassembling the helmet before the paint has fully cured.
Avoiding these mistakes will help you achieve a smoother, longer-lasting finish while protecting the overall quality of your helmet.
Sealing and Protecting Your Artwork
After painting, it’s essential to protect your artwork. Applying a clear coat will shield the paint from the elements and UV damage.
Types of Clear Coats
There are various clear coat options available, including acrylic and urethane. Urethane clear coats tend to be more durable and provide a glossy finish that enhances the colors beneath.
Choose a clear coat that is compatible with the paint you used to avoid adverse reactions.
Application Tips
When applying a clear coat, follow similar techniques as with the paint. Use light, even strokes and allow sufficient drying time between coats.
Typically, 2-4 layers of clear coat are recommended for optimal protection and shine.
| Type of Clear Coat | Durability | Finish |
|---|---|---|
| Acrylic | Moderate | Glossy |
| Urethane | High | High gloss |
The table compares acrylic and urethane clear coats. Acrylic offers moderate protection and a glossy finish but may not be as long-lasting as urethane.
Urethane, on the other hand, provides superior durability and a high-gloss appearance, making it a preferred choice for many motorcycle enthusiasts. Selecting the right clear coat can significantly impact the longevity and visual quality of the paint job.
Reassembling Your Helmet
After the clear coat has fully dried, it’s time to reassemble your helmet. This step is crucial to ensure that all components are securely fastened and that the helmet is safe to wear.
Reattaching the Visor and Liner
Carefully reattach the visor and any internal padding or liners you removed earlier. Ensure that the screws and fasteners are tight but be cautious not to overtighten, as this could damage the helmet.
Final Inspection Checklist
Before wearing your helmet, conduct a final inspection. Check for any areas that may need touch-ups, ensure all parts are securely fastened, and verify that there are no paint drips or imperfections.
A thorough inspection ensures that your helmet is both aesthetically pleasing and safe for use.
Maintenance Tips for Your Painted Helmet
To keep your newly painted helmet looking great, regular maintenance is essential. Proper care extends the life of your paint job and protects the helmet from damage.
Cleaning Methods
Use a mild soap and water solution to clean your helmet. Avoid harsh chemicals or abrasive materials that could damage the paint.
Gently wipe the surface with a soft cloth or sponge, ensuring you don’t scratch the finish.
Protecting from UV Damage
To prevent fading, store your helmet in a cool, dry place away from direct sunlight when not in use. Consider using a UV protectant spray designed for painted surfaces to provide additional protection against sun damage.
| Maintenance Task | Frequency | Method |
|---|---|---|
| Cleaning | Weekly | Mild soap and water |
| UV Protection | Monthly | UV protectant spray |
The maintenance table identifies key tasks to keep your helmet in top condition. Weekly cleaning with a mild soap solution helps prevent dirt buildup and maintains the paint’s appearance.
Monthly application of a UV protectant spray offers additional protection against fading and sun damage, ensuring your helmet remains vibrant and safe for years to come.
Alternative Customization Options
If painting isn’t your preferred method of customization, there are several alternative options available that can also enhance the look of your helmet.
Advantages of Vinyl Wrapping
Vinyl wraps provide an easy way to change the appearance of your helmet without the permanence of paint. They come in various colors and patterns and can be removed or replaced easily, allowing for greater flexibility in design.
Using Decals and Stickers
Decals and stickers are another simple way to personalize your helmet. They offer an array of designs, and you can apply them easily without the need for extensive preparation.
However, ensure that the adhesive used is compatible with the helmet material to avoid damage.
| Customization Method | Advantages | Disadvantages |
|---|---|---|
| Vinyl Wrapping | Easy to apply, removable | Can peel over time |
| Decals | Variety of designs, easy application | May not last as long as paint |
The customization options table compares vinyl wrapping and decals. Both methods offer unique advantages, with vinyl wraps allowing for an easy and removable option for customization.
However, they may peel over time, while decals provide a wide variety of designs but might not offer the same durability as painted designs. Choosing the right method depends on your personal style and how often you wish to change the look of your helmet.
FAQs About Paint a Motorcycle Helmet
Can I paint my motorcycle helmet without voiding its warranty?
While many helmet manufacturers advise against painting, as certain paints can compromise safety standards, some riders have successfully customized their helmets. It is essential to check with the manufacturer regarding their warranty policy.
If the helmet is still within warranty, painting it may void that warranty. Always prioritize safety and consider using compatible paints to maintain the helmet’s integrity.
What type of paint is safest for use on motorcycle helmets?
The safest options for painting motorcycle helmets are water-based acrylic paints or specialized helmet paints. These types of paints are less likely to damage the helmet material compared to solvent-based paints.
Always ensure that the paint you choose is compatible with the helmet’s material and that it meets safety standards.
How long does the painting process typically take?
The painting process can take anywhere from a few hours to several days, depending on the complexity of the design and the drying time for each coat of paint and clear coat. Patience is crucial, as allowing ample drying time between coats will yield a better final result.
On average, plan for at least a weekend to complete the entire process effectively.
Will the paint job affect the safety rating of my helmet?
Yes, an improperly executed paint job can potentially affect the safety rating of your helmet. Using incompatible paints or not following proper preparation techniques may weaken the helmet’s structure, compromising its effectiveness in a crash.
Always prioritize safety and choose materials that are compatible with the helmet’s design and safety standards.
Can I wash my helmet after painting it?
After painting, it’s essential to wait for the clear coat to cure fully before washing the helmet. Once cured, you can clean the helmet using a mild soap and water solution.
Avoid harsh chemicals or abrasive materials that could damage the paint. Regular cleaning will help maintain the appearance and integrity of your custom paint job.
Conclusion
In conclusion, painting your motorcycle helmet can be a rewarding DIY project that adds a personal touch to your riding gear. By following the steps outlined in this guide, you can ensure a professional finish while maintaining safety standards.
Remember to choose compatible materials and take your time during the process for the best results. Enjoy riding with your uniquely painted helmet, knowing it reflects your style and creativity.