
Testing a generator stator is crucial for maintaining its performance and longevity. A malfunctioning stator can lead to inefficient power generation or even damage the entire system. Using a multimeter, a reliable and straightforward tool, you can easily diagnose potential issues within the stator.
This process involves checking the resistance between the windings and ensuring there’s no grounding issue. Regular testing helps in early detection of faults, preventing costly repairs and downtime. Proper maintenance and timely inspections ensure your generator runs smoothly, providing uninterrupted power when needed most.
Introduction To Generator Stator Testing
Testing a generator stator is crucial. It ensures the generator works well. A faulty stator can lead to generator failure. This can cause power outages and costly repairs. Using a multimeter, you can check the stator’s condition.
Importance Of Testing
Regular testing of the generator stator is essential. It helps identify issues early. Early detection can prevent major breakdowns. A well-maintained generator improves efficiency and longevity. Ensuring optimal performance saves money and time.
Tools Required
To test a generator stator, you need specific tools. These tools include:
- Multimeter: For measuring resistance and continuity.
- Insulation Resistance Tester: For checking insulation quality.
- Screwdrivers: For accessing the stator.
- Wrenches: For removing bolts and nuts.
| Tool | Purpose |
|---|---|
| Multimeter | Measure resistance and continuity |
| Insulation Resistance Tester | Check insulation quality |
| Screwdrivers | Access the stator |
| Wrenches | Remove bolts and nuts |
Safety Precautions
Before testing a generator stator with a multimeter, prioritize safety. Ensure you follow proper safety measures. This will prevent accidents and injuries. Below are essential safety precautions.
Personal Safety Gear
Personal safety gear is crucial while working with electrical equipment. Wearing the right gear can save your life.
- Insulated gloves: Protect your hands from electric shocks.
- Safety goggles: Shield your eyes from sparks or debris.
- Non-conductive footwear: Prevents electrical grounding through your feet.
- Long-sleeved clothing: Reduces skin exposure to possible electrical arcs.
Equipment Safety
Ensuring equipment safety is essential for a smooth testing process. Proper care of tools and equipment can prevent mishaps.
| Equipment | Safety Tips |
|---|---|
| Multimeter | Check for any damage or wear. Ensure it is set to the correct range. |
| Generator Stator | Ensure the generator is turned off and disconnected from any power source. |
| Testing Leads | Inspect leads for cracks or exposed wires. Replace damaged leads immediately. |
Follow these safety precautions to avoid potential hazards. Safety should always be your top priority.
Preparing The Generator
Credit: autoedu.info
Before testing the generator stator, proper preparation is crucial. This ensures safety and accuracy. Follow these steps to get started.
Shutting Down The Generator
First, turn off the generator. Let it cool down completely. Ensure the generator is in a well-ventilated area. This prevents any accidental startup during testing.
Disconnecting Power Sources
Next, disconnect all power sources. Unplug the generator from any external devices. Remove the battery connections carefully. Safety is key during this process.
| Step | Action |
|---|---|
| 1 | Turn off the generator |
| 2 | Let it cool down |
| 3 | Ensure proper ventilation |
| 4 | Unplug external devices |
| 5 | Remove battery connections |
- Safety is the top priority.
- Ensure all steps are followed accurately.
- Wear protective gear if necessary.
Setting Up The Multimeter
Before testing a generator stator, you need to set up your multimeter correctly. A well-calibrated multimeter ensures accurate readings. Follow these steps to prepare your multimeter for the task.
Selecting The Right Mode
First, you need to choose the correct mode on your multimeter. For testing a generator stator, the resistance (Ω) mode is essential. This mode measures electrical resistance, helping identify any faults in the stator windings.
- Turn the multimeter dial to the resistance (Ω) mode.
- Ensure the probes are connected properly.
- Check if the display reads zero when the probes touch each other.
Calibrating The Multimeter
Calibration is crucial for accurate measurements. Follow these steps to calibrate your multimeter:
- Set the multimeter to the lowest resistance range.
- Touch the probes together and note the reading.
- If the reading is not zero, adjust the calibration knob.
- Repeat until the reading is zero.
Calibration ensures your readings are precise. Double-check the calibration before proceeding with any tests. A well-calibrated multimeter will give you confidence in your measurements.
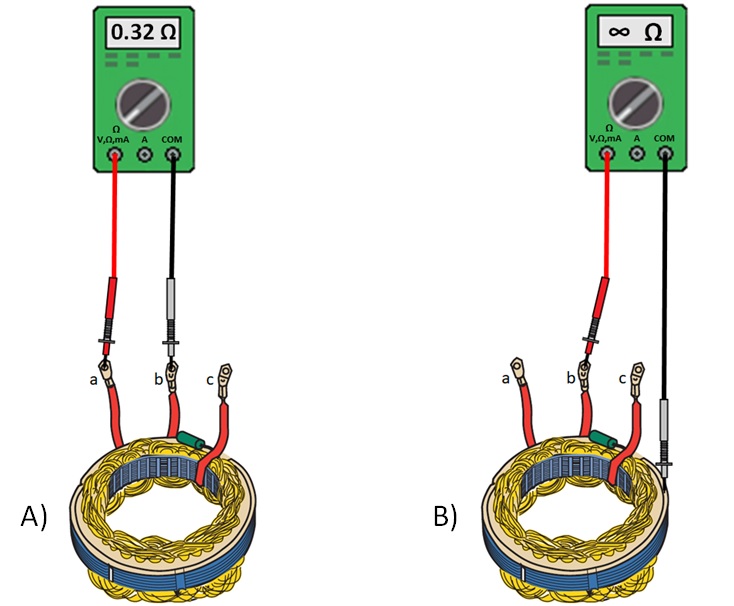
Performing Continuity Test
Testing your generator stator with a multimeter ensures it works correctly. A continuity test checks if the windings are intact. Follow these steps to perform a continuity test on your generator stator.
Testing Stator Windings
- Turn off the generator and disconnect the stator.
- Set your multimeter to continuity mode.
- Touch the multimeter probes to the stator winding terminals.
- Listen for a beep or look for a zero reading. This indicates continuity.
- Repeat for all winding terminals to ensure none are open.
Interpreting Results
Continuity means the circuit is complete. No continuity means the winding is broken. A beep or zero reading confirms the winding is good. No beep or infinite reading indicates a problem.
Keep a record of your readings for future reference. This helps in troubleshooting and maintaining the generator.

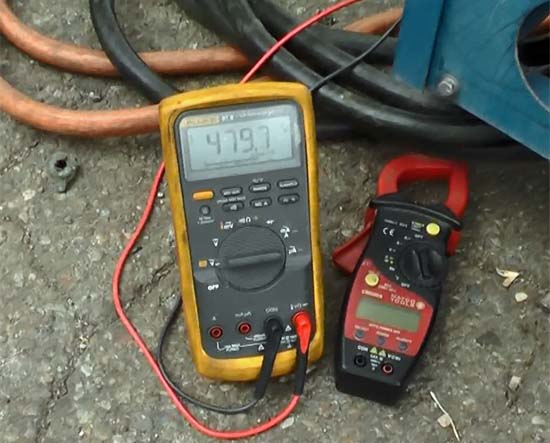
Credit: kaiweets.com
Conducting Insulation Resistance Test
Conducting an insulation resistance test is crucial. This test ensures the generator stator’s insulation quality. It helps identify any insulation degradation. Use a multimeter for accurate measurements.
Connecting The Multimeter
First, ensure the generator is off. Safety is a top priority. Next, set your multimeter to the resistance setting. Connect the multimeter probes correctly.
- Attach the positive probe to the stator winding.
- Connect the negative probe to the stator frame.
Ensure a secure connection. This step is vital for accurate readings.
Evaluating Insulation Quality
With the multimeter connected, read the resistance value. Look for a high resistance value. A reading above 1 megaohm indicates good insulation.
If the reading is low, the insulation may be compromised. Repeat the test to confirm. Consistent low readings signal a need for maintenance. Consider replacing the insulation if needed.
Regular testing ensures the generator’s longevity. Follow these steps for reliable results.
Assessing Resistance Levels
Testing a generator stator involves checking its resistance levels. This helps to ensure the generator is functioning properly. You can easily do this using a multimeter. This section will guide you through the process.
Measuring Stator Resistance
First, set your multimeter to measure resistance (ohms). Ensure the generator is off and disconnected. This is important for safety. Next, locate the stator windings. The stator has multiple windings, usually three. You will test each one.
To measure, place one multimeter probe on one end of the stator winding. Place the other probe on the opposite end. Note the reading on your multimeter. Repeat this for each winding. Record the resistance values.
Comparing With Standard Values
Compare the recorded resistance values with the standard values. These are usually provided in the generator’s manual. If you don’t have the manual, check the manufacturer’s website. Look for any significant differences.
Use the table below to help you compare:
| Winding | Measured Resistance (Ohms) | Standard Resistance (Ohms) |
|---|---|---|
| Winding 1 | 0.5 | 0.4 – 0.6 |
| Winding 2 | 0.5 | 0.4 – 0.6 |
| Winding 3 | 0.5 | 0.4 – 0.6 |
If the values are within the standard range, your stator is in good condition. If not, there might be an issue. Significant deviations suggest a problem with the stator. In such cases, consider consulting a professional.
Credit: www.generatorsource.com
Troubleshooting Common Issues
Testing a generator stator with a multimeter can reveal common issues. These problems can disrupt the generator’s performance. This section will guide you through identifying and resolving these issues.
Identifying Faulty Windings
Faulty windings can cause the generator to malfunction. Use a multimeter to check the windings. Follow these steps:
- Set the multimeter to resistance mode.
- Connect the multimeter probes to the stator terminals.
- Read the resistance value displayed.
If the resistance is too high or too low, the windings are faulty. Replace the windings to fix the issue.
Resolving Resistance Problems
Resistance problems are common in generator stators. Check for resistance issues by doing the following:
- Set the multimeter to the ohms setting.
- Touch the probes to the stator’s terminals.
- Note the resistance reading.
Compare the reading to the manufacturer’s specifications. If the resistance deviates, clean the terminals and recheck. If the issue persists, replace the stator.
| Problem | Symptom | Solution |
|---|---|---|
| High Resistance | Generator runs intermittently | Replace stator |
| Low Resistance | Generator overheats | Replace windings |
Frequently Asked Questions About How to Test a Generator Stator With a Multimeter
How Do You Test A Stator With A Multimeter?
To test a stator, set the multimeter to resistance mode. Measure the resistance between the stator windings. Compare the readings with the manufacturer’s specifications.
What Should A Stator Read On A Multimeter?
A healthy stator typically reads low resistance, often between 0. 2 and 2 ohms. Always check the manufacturer’s specifications for accurate readings.
Can A Bad Stator Cause No Spark?
Yes, a faulty stator can prevent the generator from producing a spark. This results in the engine not starting.
How Do You Check For A Short In A Stator?
Set the multimeter to continuity mode. Test between the stator windings and the ground. Continuity indicates a short.
Conclusion
Testing a generator stator with a multimeter is straightforward and essential for maintenance. Follow the steps carefully to ensure accuracy. Regular testing helps prevent unexpected failures. Always prioritize safety while working with electrical components. Keep your generator running smoothly by performing these routine checks.